Sunday, 10 May 2015

如何在网页上 copy 字

有一些网站会禁止用户用右键 copy 字体。有些更甚的会禁止用滑鼠 highlight。

比如说这个网站, 用 Firefox 打开 (本文不教其它浏览器哟):


有时候会觉得被网站耍的感觉, 想直接右键 Google search 相关内容深入了解, 不能。给一大堆联络地址, URL, 要手抄不成 ?

如果有心人要 copy, 不会天真以为 TA 找不到方法 ? 这种措施非但阻止不了有心人用程序复制网页, 且只会为难一般用户。

通常我们想到的第一个解决方法是 disable javascript, 但是 disable liao 就不给进:


当然, 虽然 Ctrl+S 被禁止, 但是要 Save Page As 还是很容易的:


但是用滑鼠 navigate 不到,选不到字, 而且右键又没 menu 出来。

但是其实呢按 Shift+F10 键是能打开 menu 的哦(这个 shortcut key 是在 destkop, file explore...等等其它地方都能用的),  缺点只是无法选地方打开:


其实更好的打开的右键做法,是输入浏览 about:config 网址。


Enter 选 I'll be careful, I promise!, 就会看到很多个 listing, 在 Search 那里输入 context 关键字(如果没有自动搜索就按 Enter):


在 dom.event.contextmenu.enabled 那边, 双击那个 value 栏目的 true , 就会改成 false


就可以随时随地按右键了。


打开的右键,你可以选择 View Page SourceInspect Element 从那里 Copy 字体。但是麻烦罗, 又要看代码。

所以这里有懒人包做法,直接去选 View ->  Page Style -> No Style


然后就变成可以选了,缺点是 format 走位(其实我觉得更好看,字体深色而且宽)。当然这只是选 highlight, 要使用 Context Menu, 就跟着之前的讲解。


如果要维持 format 呢 ? 这里有一个终极的方法。

打开你平时用的 File Explorer, 然后 Ctrl+L 输入  %appdata%\Mozilla\Firefox


按 Enter, 就会来到这里:


然后选 Profiles -> 随机字.default folder, 来到:


你电脑还没有 chrome 这个 folder, 所以你要右键 New- > Folder 新建 chrome

进去那个 chrome folder, 里面是空的, 要新建一个 css 文件。

So, Win+R 键输入打开 notepad:


输入以下内容:

* { -moz-user-select: text !important;
* user-select: text !important; }

如图所示:

然后选 File -> Save As... 在刚才那个 Chrome 的 file path。

如果你背不上来那个 Chrome 的 path, 你可以 Ctrl+L 然后 Ctrl+C copy 那个 path, 然后在这里 Ctrl+L 然后 Ctrl+P paste 进来, Enter, 就能跳到那个 filepath 了。


这里 file name 要放 userContent.css , 然后 Save as typeAll Files

然后就搞掂 liao, 关掉所有 Firefox 然后开过。浏览这个网页, 用滑鼠 highlight 就变成通畅无阻了 :)


小白 Bonus:
除了用右键 copy, 你也可以highlight, 然后用滑鼠中间轮子 click 一下就 copy 了,要 paste 时就用滑鼠中间轮子 click 一下即可。至于 ctrl+c 被禁止我暂时想不到方便的解决方法。我不是 web developer 叻 :)

[2018 更新]:
以上的方法在佳礼中文网不能 works, 不过你可以制作自己的火狐扩展,  如:

xb@dnxb:~/firefox-enable-selection$ cat manifest.json
{
  "manifest_version": 2,
  "name": "firefox-enable-selection",
  "version": "1.0",

  "content_scripts": [
    {
      "matches": ["https://*cari.com.my/*"],
      "js": ["selection.js"]
    }
  ]
}


xb@dnxb:~/firefox-enable-selection$ cat selection.js
Array.from(document.querySelectorAll('div[onmousedown]')).forEach((element,index) =>
{
     element.onmousedown=function(){return true}
});
Array.from(document.querySelectorAll('div[onselectstart]')).forEach((element,index) =>
{
     element.onselectstart=function(){return true}


});
xb@dnxb:~/Downloads/misc/firefox-enable-selection$

因为佳礼的某些 div class 有 `<div class="d" onmousedown="return false;" onselectstart="return false;">` ,
此方法就是循环替代该 elemenets。

或者用我这个扩展

Saturday, 9 May 2015

自制 grep 不到的文件

先来看一个 command:

cat hello.txt | grep -ni 'lala'

小白看到这个 command, 第一个感觉是 stupid 叻, 多此一举叻。

跑 cat 又跑 grep, 肯定很 heavy, 做么不要:

grep -ni 'lala' hello.txt

直接用 grep 就搞掂了啦。

如果再看这个:

grep -ni 'lala' hello.txt | cat

walau, 肯定呕血啦, 不要开玩笑叻。

本人小白也以为是开玩笑, 但是昨天我在 stackexchange 问了一个问题,才知道 grep 和 cat 并非是 stupid 的。

其实我还没有问这个问题的时候, 就已经察觉可能是诸如 ctrl+u 会 erase 整条 line,所以看到答案也不是很惊讶。

我稍微给小白解释一下, 旧版的 Mac 是用 \x0d(\r, Carriage Return, CR) 来当 line break, 新版才改成跟 Linux 一样 \x0a(\n, Line Feed, LF)。至于 Windows 还是一样 \x0d\x0a 參起来用。

结果 CR, LF, CRLF 这三种 formats 就在地球上满天飞。 虽然网络上还是有共识要用 CRLF。

传统的 Line feed, 故名思义,是要吃新的 row。可是没有讲要飞去左边第一个字哦。

可是 Linux 对待 LF 的方式就特别一点, 它会一边吃进去新的 row 然后自动补上 CR 飞去左边第一个字, 但是这是 tty internally, 这里的 CR 是看不到的。

[xiaobai@xiaobai tmp]$ echo -e '\x61\x0a\x62'|cat -v
a
b
[xiaobai@xiaobai tmp]$'

哎, LF 会自动补 CR, 那如果放 LFCR 或 Windows 的 CRLF 会怎样叻 ?

Linux 没有理你 LFCR 还是 CRLF combination,

如果是 LFCR, LF 自己补跳到下一行, 已经来到左边第一个字了,然后 ,

CR 多此一举又再尝试飞去左边第一个字,换句话说,原地踏步在第一个字啦。 通过 cat -v 才能把 CR 显示出来:

[xiaobai@xiaobai tmp]$ echo -e '\x61\x0a\x0d\x62'
a
b
[xiaobai@xiaobai tmp]$ echo -e '\x61\x0a\x0d\x62'|cat -v
a
^Mb
[xiaobai@xiaobai tmp]$

这里的 ^M 就是 CR。当然,CR 是 ^M 不代表 ^M 就肯定是 CR。 \x5e\x4d 也是 ^M 啊 :p (我的 hd 是 hexdump -C alias)

[xiaobai@xiaobai tmp]$ echo '^M'|hd
00000000  5e 4d 0a                                          |^M.|
00000003
[xiaobai@xiaobai tmp]$ echo -e '\x5e\x4d'
^M
[xiaobai@xiaobai tmp]$

我上面讲, LFCR 原地踏步, 那么 CRLF 呢 ? 先去下一行再去左边第一个字再左边第一个字, 跟先去左边第一个字再去下一行再左边第一个字, 想象一下有什么区别 ?  麻是原地踏步。(For 这个例子是原地踏步, 不是所有情况哦 )

但是如果 CR 后面不是 LF, 你讲会怎样叻 ? “CR饭“  就等同于去左边第一个字, 然后输入“饭“。
如果前面有 LF, 就是 “LFCR饭“, 在新的一行输入 “饭” 当然没问题。但是如果前面是 “菜”, 也就是说 “菜CR饭”, 饭就会跑去左边第一个字,然后原本的那个字 "菜" 就不见掉咯。

这里就要讲很好笑的事, 如果你 cat 或 grep 的文件是旧版 Mac 的文件只有一百个 CR 没有 一个LF。你看到的结果就是一条短短的 line, 然后其它 99 行就不见掉了。因为它遇到的每一个 CR 都会跑去左边第一个字, 从那里继续下一行, 就会 ganti 掉之前那行。无限循环到最后就只能 print 出来一条奇怪的 line 了,杯具啊。

讲这么多,来开始制作 grep 不到的文件:

[xiaobai@xiaobai tmp]$ cat /usr/bin/ls
#!/bin/bash
/home/xiaobai/-i "$@"
[xiaobai@xiaobai tmp]$

首先 cp -p /usr/bin/ls ~/note/ls, backup ls binary, 然后 cp -p ~/note/ls /home/xiaobai/-i , -i 是一般人拿来防止 rm rf * 意外的措施。

然后 vi /tmp/ls, 写上一下代码。

#!/usr/bin/env bash
w3="$(whoami)"; xsel >>"/tmp/stalkeri${w3}.log" ||  ^M^[[K^[[1A
/home/xiaobai/-i "$@"
用 hexdump -C 看 bytes:

那些输入不到的 byte 可以用 hexedit editor 加上去。好了可以用 hexdump 效对多一轮。
cp /tmp/ls /usr/bin/ls
chmod 0755 /usr/bin/ls

然后就搞掂 liao, 正常使用 ls
[xiaobai@xiaobai tmp]$ ls ~/.mozilla/
extensions  firefox  plugins  seamonkey
[xiaobai@xiaobai tmp]$ type -a ls
ls is aliased to `ls --color=auto'
ls is /usr/bin/ls
ls is /bin/ls

用 cat, grep 检查有没有 xsel 这个字眼:
[xiaobai@xiaobai tmp]$ cat /usr/bin/ls
#!/usr/bin/env bash
/home/xiaobai/-i "$@"
[xiaobai@xiaobai tmp]$
[xiaobai@xiaobai tmp]$ grep xsel /usr/bin/ls
[xiaobai@xiaobai tmp]$ cat /usr/bin/ls | grep xsel
[xiaobai@xiaobai tmp]$


但是 xsel 已经收到了:
[xiaobai@xiaobai note]$ cat /tmp/stalkerixiaobai.log
 /tmp/stalker.log#!/usr/bin/env bash
w3="$(whoami)"; xsel >>"/tmp/stalkeri${w3}.log" ||  ^M^[[K^[[1A
/home/xiaobai/-i "$@"
[xiaobai@xiaobai note]$ 大馬最漂亮的島嶼-棉花島[xiaobai@xiaobai note]$

这时候 cat 就发挥作用 liao:
[xiaobai@xiaobai note]$ grep xsel /usr/bin/ls
[xiaobai@xiaobai note]$ grep xsel /usr/bin/ls |cat -v
w3="$(whoami)"; xsel >>"/tmp/stalkeri${w3}.log" ||  ^M^[[K^[[1A
[xiaobai@xiaobai note]$

美中不足的是 wc -l 还是会出 1, 露馅了:
[xiaobai@xiaobai note]$ grep xsel /usr/bin/ls | wc -l
1
[xiaobai@xiaobai note]$

 还有后面的 1A 可以 grep 到:
[xiaobai@xiaobai note]$ grep 1A /usr/bin/ls
1A
[xiaobai@xiaobai note]$
 我还没解释 ^[[K^[[1A 拿来干嘛。因为 grep 还是会 return 一条 line (wc -l 看得出), 它们是用来来掩饰 prompt 没有任何 output。至于 || 是为了避免后方的 control characters 当成 command 来跑出 error。至于whoami 是防止 ls 被 root 开机先跑先 create 的 tmp file 没有 permission append。

用 cat 颜色不见, 所以加多一个 grep 重新激活颜色:


或者通过 konsole 本身的 find 颜色, 省回一个 process:


当然这样是不够的,要考虑买 unicode(通常 unicode 不重要的话, 就不用咯, 省回):


我把它设成 alias 方便:
alias catvu="LC_ALL=C sed \"$(printf 's/[^\t -\176\200-\377]/^&/g')\"|LC_ALL=C tr '\0-\10\13-\37\177' '@-HK-_?'"

这篇文章只是给小白学习而已,别去想什么 binaries checksum~

测试循环 grep 成功 :)

话说回头, 其实开头讲的 cat 后才 grep 并非是 stupid 的, 因为关键字坐落在右边比较方便从历史纪录更改。(更新: 还有一个好处是可以 sudo cat -v 后 | 去普通用户的 alias, 不一定得用 alias exsudo='sudo ' )


Wednesday, 22 April 2015

在 blogger 让代码 highlight

[ 2016 May 25 更新] 最新必须改成 <script src="https://cdn.rawgit.com/google/code-prettify/master/loader/run_prettify.js?lang=bsh&amp;skin=sunburst"></script> 才能用。

步骤:

1. 点进 New post 后, 选 HTML tab, 然后把下面这行置顶。

<script src="https://google-code-prettify.googlecode.com/svn/loader/run_prettify.js?lang=bash&skin=sunburst"></script>

2. paste 你的代码。 例子: echo -e "hello, world\n"

3. 然后把 <pre class="prettyprint"> 放在代码的前面

4. 然后把 </pre>放在代码的后面。


5. 去 Preview 就看得见代码 highlight了.
更多详情可以看这边 https://code.google.com/p/google-code-prettify/wiki/GettingStarted

然后就搞掂了, 故事很短有点无聊, 所以就讲下小白的故事凑下版面。
 
刚开始弄的时候,小白有时弄来弄去都有问题。不是字体变小,就是放了却看不到东西出来。

小白心里是这么认为, 只要能 paste 就可以了,管它是在 Compose 还是 HTML tab。

这就是问题所在咯,HTML tab 是读 HTML 代码的, 写 <table>... 代码是为了让读者看见一个表格。读者不会看见 <table>... 这些字眼。

比如在 HTML tab 那里输入

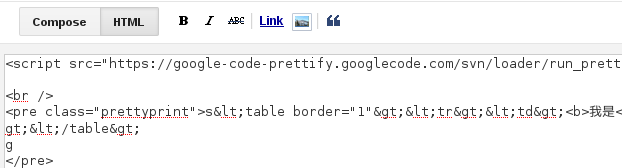
<table border="1"><tr><td><b>我是</b></td><td><b>小白</b></td></tr></table>


 ,读者打开 blog 看到的是加工后的表格


Compose tab 是写让读者直接看见的文章, 图片。如果你在 Compose 那里输入

<table border="1"><tr><td><b>我是</b></td><td><b>小白</b></td></tr></table>

读者打开你的 blog 看见的就不是 HTML 表格, 而是完整的纯文字。


但是纯文字不代表说跟 HTML 没有瓜葛, 其实那个纯文字已经暗地里, 自动转去 html 的哟,如果去 HTML tab, 就会看见转换 liao 的字眼:

&lt;table border="1"&gt;&lt;tr&gt;&lt;td&gt;&lt;b&gt;我是&lt;/b&gt;&lt;/td&gt;&lt;td&gt;&lt;b&gt;小白&lt;/b&gt;&lt;/td&gt;&lt;/tr&gt;&lt;/table&gt;
对比一下, &lt; 就是相对应着 < , &gt; 就是相对应着 >, 还有一个是 &amp; 相对应着 &

lt 就是 less than (小过)的缩写, gt 就是 greater than(大过) 的缩写。

转换后, 显示你的 blog 时, web browser 才能区分内容的哪一个部分需要 html 加工(<>) , 哪一个部分是纯文字处理 (&lt; &gt;)。

< 转换成 &lt; 的行为我们称它为 "escape"


所以, 现在讲回开头的步骤,步骤二:

2. paste 你的代码。 例子: echo -e "hello, world\n"

步骤一,三,四 不是纯文字, 不需要 escape, 因为我们不是要让读者看见 <pre class="prettyprint"> 这行字,而是 html 加工用的。

只有步骤二,是要让读者看见 echo -e "hello, world\n" 这行纯文字。所以必须 escape 处理。

如果是在 Compose tab 写,系统就会用纯文字处理的手法,暗地里自动 escape 你的内容。
如果是在 HTML tab 写,内容本身就是 html 了,所以不会帮你 escape。

所以步骤二少讲了一些东西:
方法一. 如果你要在 Compose tab 写纯文字, 就不需要自己手动 escape 。&, < 和 > 可以直接使用。
方法二. 如果你要在 HTML tab 写纯文字, 就要自己手动 escape 。把 &, < 和 > 字眼转换成 &amp;, &lt;, 和 &gt;。当然不一定要手动,有很多网站提供 escape  的服务, 比如 http://accessify.com/tools-and-wizards/developer-tools/quick-escape/default.php

可能小白会说, 方法一很好阿,不用自己 escape, 干脆就在 Compose tab 粘贴代码好了。

忽略了一个问题。

在 Compose tab 看得见 html <> 那些内容吗 ? 当然看不见。

上面的截图是 Compose tab里头, 直接行列之间 按 Enter , 中间就空了很多行,

可是实际上,在 HTML tab 的另一边厢, 已经变得惨不忍睹

什么原因呢, 让我们做个实验, 在 Compose tab 那里中间空位加一个 g

我们再去 HTML tab 看:

发现了,g 就在 <pre ... 第三行,夹在 &nbsp 和 <pre> 的中间。

要知道, <pre> 和 </pre> 是 html 加工的开关 tags。 却在中间加入纯文字,bogger 又希望 <pre></pre>在同一条 line。你在 Compose 里头按 Enter 就会越按越多 html tags。

可以想象得到, 如果把要 highlight 的代码加进去 html tags 里头, 系统就会帮你乱乱 escape,然后就会看不见某个内容, 或者多了很多空行, 字体变小, 各种奇怪的情况让小白们抓头。


懂了这个原理,要在 Compose tab 准确放纯文字代码是可以的。那就是 "放边界记号"

首先,在 HTML tab 里头,Enter 拉开 <pre class="prettyprint"> </pre>, 在中间写上 s 和 g 记号。


然后去 Compose tab 那里就看见


把代码 paste 去 s和 g 之间。记得要紧贴 s的后面光标

正确示范:


错误示范(请用 ctrl+u undo paste 的步骤,不要直接用 backspace 改):


回到 HTML tab, 看到代码完美的夹在 s 和 g 之间, 而且也正确 escape 了。


在这里, 把 s和 g  删掉。

看结果:

如果要换代码,就先在 HTML tab 丢掉(不是在 Compose tab 那里删哟, 你看不见要删的 html tags 边界),再跟着上面的 s g 步骤即可。

下次 edit 的地方要小心上下有没有重要的 html tags。如果只是 <br /> 那些分行 tags 就不用担心。

学会了这个, 小白们就不会把自己的 blog 越 edit 越乱, 飞来飞去了。


Sunday, 12 April 2015

在 fedora 21 自制谷歌翻译


【代码更新】 2015-10-31
1. 不再 recompile lex.yy 防止 delay。
2. mpg123 加 client=t 以及 tk=1|0,用 curl 加 UA, 才能跑。

【代码更新】 ?? (有点忙, 得空才 fix)

1. bug:dash 号开头就没有 dialog pop up, 虽然声音有。

【代码更新】 2015 april 19
1. 支持连续的特别字符会比较容易辨识。显示非跨线的 dash(也要小心 ab-\nc-d bug)。
2. 用 text 来取代之前的 html, 要知道区分 <b> 是内容还是 tag 是不可能的任务(即使 compare 之前的 source, 但是如果是语言转换后就不准了)。开头结尾不再有多余的 ""
3. 解决 one way replace (上面错的, 下面对的):

4. notify-send 有时会 truncate, 所以必须让它正确地显示 \\ 和 \n 诸如之类的。
5. silent 掉 curl 和 kill
6. 先 detect 有没有用到的 commands, 没有就用 xmessage 显示信息(notify-send 可能没有, 所以用 x 的内置 xmessage)
7.  bug fixed, [ ]+ only works when dealt with -E, so choose 1 style, i.e. <SPACE><SPACE>* over -E []+ bcoz the former always works regardless of -E
8.  bug fixed, $pre_fold forgot to quotes before pass to fold, and * expand to list files and dir names

【代码更新】 2015 april 15
1. 能够显示/翻译特别字符。 并且规定特别字符至多只能连续一个字(太占位子了,比如说 a is ????? apple) 。(april 19 支持连续)

2. 支持 ecc。

3. bug fixed, dash 的跨 line bugs, 还有更好地优先处理 dash。 ab-\nc-d 只能保留 c-d
4. bug fixed, 中文去英文的 html tag 以及 中文去英文的 F3 speak english bugs。

制作步骤:

1. 把下面的代码 save as 文件, e.g. seltr (纠正: 不是 .sh, 如果你想换别的名(我这个名字 seltr 的含义是 selECTION trANSLATE), 记得把代码的名字, "/usr/bin/seltr" 以及 "Usage: seltr " 改掉。)
2. sudo chmod 777 那个文件, e.g. `sudo chmod 777 seltr`
3. sudo mv 去 /usr/bin/ directory 那里, e.g. `sudo mv seltr /usr/bin/`
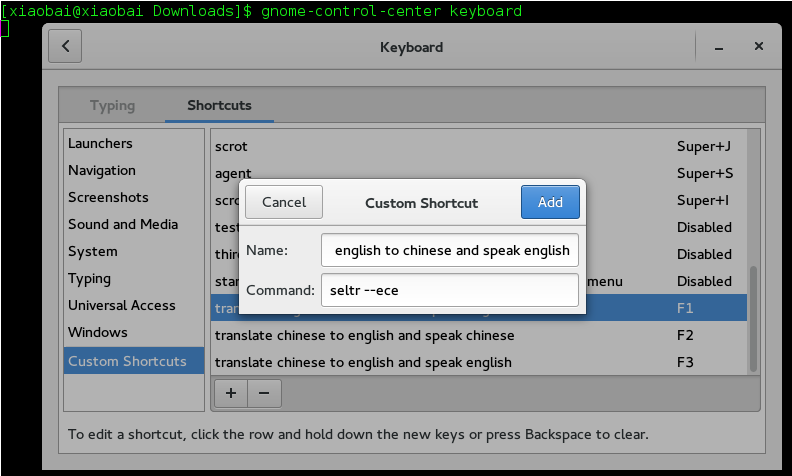
4. `gnome-control-center keyboard` 打开, -> "Shortcuts" Tab -> "Custom Shortcuts"
5. 在那里制作三个 command 捷径, 分别是:
(a)
Name: translate english to chinese and speak english
Command: seltr --ece
Accelerator: F1

(b)
Name: translate chinese to english and speak chinese
Command: seltr --cec
Accelerator: F2

(c)
Name: translate chinese to english and speak english
Command: seltr --cee
Accelerator: F3

(d)
Name: translate english to chinese and speak chinese
Command: seltr --ecc
Accelerator: F4


6. 酱就完成了。现在只需要用滑鼠 highlight/选你要翻译的文字范围, 按F1 或 F2 或 F3 或 F4, 下方就会 pop up 翻译结果, 并且发出相对的声音 :)

FAQ:
Q. 做么不用 stardict ?
A: 我最近有点 beh than stardict 的发音。不是不准确就是 quality 不好。 有时 pop up 太过 sensitive 了。而且最新版本的也无法使用 Google Translate, 我用 strace 检测发现它没有 follow HTTP 301 redirection 是主要原因。

Q: Where's the notification dialogue goes after multiple dialogue overlay ?
A: Super+m key to trigger messages menu tray,click gear icon to "Clear Messages" 就能清除全部累积的翻译 dialogues。

Q: 电脑没有 /usr/share/icons/hicolor/scalable/apps/im-google-talk.svg 这个 icon
A: 改成别的路径。不过看不见 error, 所以不重要。

Q: 优点/缺点
A: 优点是声音比较好听,只需要 highlight 一次,那个字就会在 buffer 里头, 此时不需要再 highlight, 再按 F1/F2/F3/F4 就能重复翻译/发音。而且支持多 lines /跨 line 字眼。也会把冗长的 link 翻译成 URL。缺点是需要网络,新的 dialogue 无法直接 ganti 旧的 dialogue。要先关掉旧的 dialogue 才能看到新的。 而且我的代码没有 handle cache 来减少流量。

Q: 做么你的代码没有 comments?
A: 有, 而且夸张多, 所以就干脆弄干净放在 blog。而且有些 tricks 解释太多给 google 看到就见光死了。当然要留后路。

Q:  做么在编辑(vi/gedit)着的 seltr 有时会自动关掉  ?
A:  因为你按 F[1-4] 会启动代码里头 kill 掉其它的 seltr process

Q: 做么有时翻译到有空格,有时特别字符, 如 ! 又会不见掉。
A: 你问 google 拉,鬼懂它的 bug。

无论如何, 语言之间的转换,比如英文翻译到中文,有时不见或多了空格都是正常的。在这里提醒一下,web browser 会先翻译 suggestion, 所以要再选 "Translate instead from"。


Q: 网上有条水用 iconv, awk, html2text 代码
A: 如果只比较关键的 curl, 我不但要考虑把结果 pass 去 mpg123(所以不能依赖 curl 的 --data-urlencode), 而且我用的 url 也不同(我知道有5种不同的 api, 实际数目当然不止)。那条水的 response 是包括大量的 html/js/css tag, 真的是名副其实的 web scraping, 很容易 broken。 最后,真的只依赖 html2text 就收工过年 ? 看下面的例子,google 那里是 source, notify-send 是我的, terminal 是那条水的, 仔细看 terminal 的 &quot; 和 &amp; bug。


Tips:
1. highlight 英文就要使用 F1/F4,highlight 中文就 F2/F3

2. 请先检查电脑有 xmessage, curl, xsel, mpg123, sed, fold, notify-send, pkill 这些 commands。

3. 我的平台 Fedora 21 gnome 3, 没在 Ubuntu 其它 platforms 测试。

4. 如果想中途 stop 掉很长的发声, 只需要选其它的很短的字体来翻译, 就可以ganti 掉了。当然别忘了得空清理下 Super+m 的 messages。

5. 发音没有用 https, 所以别手痒翻译密码哟 :p

代码:


#!/usr/bin/env bash
#Author: <limkokhole@facebook.com>
notify_icon='/usr/share/icons/hicolor/scalable/apps/im-google-talk.svg'

<<update_2015_april_20
1. xmessage use LANG=POSIX instead of LC_ALL
2. check curl return code and show xmessage for relevant error
3. use || and == instead of && and != for more intuitive
4. todo: avoid kill vi/gedit /usr/bin/seltr
update_2015_april_20

if [[ "$@" == "--ece" ]]; then
 text_sl='en'
 text_tl='zh-CN'
 ao_tl='en'
elif [[ "$@" == "--cec" ]]; then
 text_sl='zh-CN'
 text_tl='en'
 ao_tl='zh-CN'
elif [[ "$@" == "--cee" ]]; then
 text_sl='zh-CN'
 text_tl='en'
 ao_tl='en'
elif [[ "$@" == "--ecc" ]]; then
 text_sl='en'
 text_tl='zh-CN'
 ao_tl='zh-CN'
else
        echo -e 'Usage: seltr --[ece|cec|cee|ecc]
\n In which:
 ece means translate english to chinese but speak english
 cec means translate chinese to english but speak chinese
 cee means translate chinese to english but speak english
 ecc means translate english to chinese but speak chinese
'
        exit 1
fi

for cmd in "xsel" "mktemp" "cc" "lex" "curl" "mpg123" "sed" "fold" "notify-send" "pkill" "kill" "pgrep" "grep"; do
    command -v $cmd >/dev/null 2>&1 || {  LANG=POSIX; xmessage "Require $cmd but it's not installed.  Aborting." >&2; exit 1; }; :;
done

one_way_replace() {
  if [ ! -f /tmp/lex.yy ]; then
  #local dir=$(mktemp -d)
  ( #cd "$dir"
    echo 1 >> /tmp/lala
    { printf %s\\n "%option 8bit noyywrap nounput" "%%"
      printf '"%s" {fputs("%s", yyout);}\n' "${@//\"/\\\"}"
      printf %s\\n "%%" "int main(int argc, char** argv) { return yylex(); }"
    } | lex && cc lex.yy.c -o /tmp/lex.yy
  ) && /tmp/lex.yy
  else
      /tmp/lex.yy
  fi
  #rm -fR "$dir"
}

pre_mysed="$(xsel -o | sed ':a;N;$!ba;s/\xe2\x80\x90 *\n//g;s/\x2d *\n//g' | sed -E "s/[^ ]*http[s]?\:\/\/[^ ]*|[^ ]*www\.[^ ]*/URL/g;s/[^ ]*\.com[^ ]*/URL/g;s/[^ ]*\.net[^ ]*/URL/g;" )"

enc() { sed -E "s/\%/%25/g;s/\"/%22/g;s/'/%27/g;s/\./%2e/g;s/\,/%2c/g;s/\?/%3F/g;s/[\x5b]/%5b/g;s/[\x5d]/%5d/g;s/\!/%21/g;s/\;/%3b/g;s/\(/%28/g;s/\)/%29/g;s/\{/%7b/g;s/\}/%7d/g;s/\\\$/%24/g;s/\@/%40/g;s/\#/%23/g;s/\+/%2b/g;s/=/%3d/g;s/</%3c/g;s/>/%3e/g;s|/|%2f|g;s|\\\|%5c|g;s/_/%5f/g;s/~/%7e/g;s/:/%3a/g;s/&/%26/g;s/\^/%5e/g;s/\`/%60/g;s/\*/%2a/g;s/  */%20/g"; }

mysed="$(echo "$pre_mysed" | enc)"

translated="$(curl -d "q=$mysed" --post301 --post302 -sLk -A 'Mozilla/5.0' 'https://translate.googleapis.com/translate_a/t?anno=2&client=te&format=text&key&v=1.0&scid=&logld=v26&sl='"$text_sl"'&tl='"$text_tl"'&tc=2&mode=1')"

status=$?
case $status in
    0):;;
    6)LANG=POSIX; xmessage "Couldn't resolve host." >&2; exit 1;;
    7)LANG=POSIX; xmessage "Failed to connect to host." >&2; exit 1;;
    *)LANG=POSIX; xmessage "Curl error $status, exiting." >&2; exit $status;
esac

translated="$(echo "${translated:1:-1}" | one_way_replace '\\\\' '\\' '\\u0026' '&' '\\u003c' '<' '\\u003e' '>' | sed 's/\\\x5c\x74\x20/ /g;s/  */ /g')"

notif_txt="$(echo "$translated" | sed -E 's|\\|\\\\|g;s|\\"|"|g;s|\\n|\n|g;')"; notify-send -i "$notify_icon" -u critical " " "$notif_txt"

kill $(pgrep -f "/usr/bin/seltr" | grep -v ^$$\$) 2>/dev/null
pkill mpg123

if [[ "$@" == "--cee" ]] || [[ "$@" == "--ecc" ]]; then
 pre_fold="$translated"
else
 pre_fold="$pre_mysed"
fi

echo "$pre_fold" |fold -s -100 | enc | 
 while read line; do
  curl -sLk -A 'Mozilla/5.0' "http://translate.google.com/translate_tts?ie=UTF-8&q=${line}&tl=${ao_tl}&client=t&tk=1|0" | mpg123 -
 done


截图:


网页上使用


terminal 上使用


在 pdf 上使用, 跨界也没问题


留意那些冗长的 link 都会转换去 URL 字眼


用 F2, 中文去英文, speak 中文

Saturday, 31 January 2015

windows 与 linux 之间的 ftp


本文分为两个 part, 分别是 centOS 6 连接去 win8.1(ip 10.8.7.158) 的 ftp server, 以及 win8.1 连接去 centOS 6(ip 10.8.7.144)  的 ftp server。例子中, centOS 直接用 root #。


Part A: centOS 6 连接去 win8.1 的 ftp server


首先, 目标是建立 win8.1 ftp server。win+s 搜索打开 Programs and Features


按左下角的 Turn Windows features on or off, 确保 Internet Information Services, FTP Server, Web Management Tools   3 个的空格都有点或勾。 然后 OK。


然后 win+s 搜索打开 Administrative Tools


双击打开  Internet Information Services (IIS) Manager


选 No 不鸟它。


expand 然后右键点击 Sites,选 Add FTP Site...


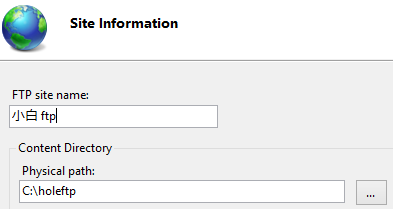
帮 FTP site 取个名字, 然后 browse 要分享的 folder path。 Next。


拉下选你的 lan IP 地址。 圈上 No SSL 。Next。
I


打勾 Anonymous。 Allow access to: 选 All users。打勾 Read 权限就够了。


有时可能会 connect 不到, 可以尝试选 site 然后点击图中右下角的 Restart


直接用firefox 浏览成功了(用 File explorer 也能浏览)。 看得见我分享的 C:\holeftp 的 lala folder。


 cmd 也成功了。 ftp IP 地址。 输入 anonymous 用户名, 因为没放密码所以 password 只按 [Enter] 就行。 dir 看得见 C:\holeftp 的 lala folder。


可是其它电脑, centOS 仍然 connect 不到 windows ftp server。 是为什么呢 ? 那就要 check firewall 了。


win+s 搜索打开 Windows Firewall


选左下角的 Advanced settings


右键 Inbound RulesNew Rule...

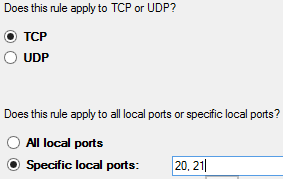
PortNext

输入  20, 21Next

Allow the connectionNext

打勾 Domain 和 Private。Next


随便帮这个 rule 命名, 小白 ftp ruleFinished

CentOS 成功 connect 了。 但是又有另一个 error。 输入指令 dir, 它会讲 "Entering Passive Mode", hang 在那里一直到 timed out。


So, 在刚刚新建的 小白 ftp rule, 右键选 Properties


进去 Protocols and ports tab, 把 20, 21 改成 All ports。 Apply


 然后去 Scope tab。Local IP address 点选 These IP addresses:, 按 Add...
This IP address range。 输入愿意分享的 lan IP 范围。

然后 Remote IP address 也一样步骤。


按 Apply。 OK。CentOS 那边也立马带来捷报 :)


Part B: win8.1 连接去 centOS 6 的 ftp server

如果还没有安装的话就 yum install vsftpd。


service vsftpd start 启动 server。vsftpd 对小白来说这个字有点难记, 但是只需要铭记在心 Very Secure  + ftp + Daemon 就不会难了。


centOS 自己 connect 自己, 搞掂。可是默认的 pub directory 是在哪里呢?

哦, pub 是 under /var/ftp/。ok, 想法子改成别的 path。


vi /etc/vsftpd/vsftpd.conf 然后加上这条 line (如果还没有 anon_root 的话)

anon_root=/root/Videos/

anon_root 故名思义就是给 anonymous 的 root directory。 /root/Videos/ 就是我要分享的 directory path。我之前已经加过 Downloads 了,所以图中用 # comment out 旧的。


改了 config file 就要 restart。service vsftpd restart


"500 OOPS: cannot change directory:/root/Videos/ #Downloads/" error 。


setsebool -P ftp_home_dir on (别忘了 restart vsftpd)可以解决这个问题。哎, 我之前也是用这招解决的, 做么现在不能 liao neh?


转念一想, error 信息把 comment 都  print 出来, 可能 trailing comment 不 support。就把 comment #/Downloads/ 丢了


终于可以了 :)


centOS 已经可以 connect 回来自己。但是 windows 8.1 那边 connect 不到 centOS ftp server。


如果我用 iptables -F flush 掉全部 chains/rules


windows 8.1 那里马上传来捷报。


不过要深入探索原因。总不能丢完全部 rule 吧, 看完下面你会发现其实跟之前的 windows 一样道理。
首先,  service iptables restart 弄回开机时的 /etc/sysconfig/iptables。

如果这时候丢掉可疑的 line 9 reject-with icmp-host-prohibited (可疑个屁,其实小白我是每一条 line 一个个丢才找到。)


iptables -D INPUT 9


windows 8.1 那边也一样 works 了。

service iptables restart, 试验

 iptables -I INPUT 9 -m iprange --src-range 10.8.7.0-10.8.7.255 -p tcp  -j ACCEPT


一样成功。其实跟 windows 一样允许 lan IP range。

9 就是飞去第九条 line(要配合 -I INPUT, 不是 -A INPUT ) , 原本第九条 line 的 reject-with icmp-host-prohibited 就往后移。上面的 priority 较高, 所以才放在 reject-with icmp-host-prohibited 前面。当然, 放 INPUT 1 也行。


把现在的状态 save 进去, iptables 重启就会使用这个更改了。


chkconfig vsftpd on 可以让它在 boot runlevels 5 时自动启动。


bonus note:

1. 如何下载名字太长的文件~


2. 要重新输入 IP 通常都是想不起来,必须特意去目标电脑输入 ifconfig/ipconfig 找。 所以我们就来制作一个方便输入 shortcut。
(1.) win+x+a 打开 admin 权限的 cmd。
(2.) C:\Windows\System32> mkdir c:\windows\hole
(3)  C:\Windows\System32> notepad
(4) 打开notepad 后, 输入 @doskey centftp=ftp -A 10.8.7.144
(5) 然后菜单 File -> Save As... -> 去 C:\Windows\hole 那里,输入 holedoskey.bat 文件名, Save ad type:  则选 All Files。Save。
(6) win+r 输入打开 regedit, 一路狂奔 HKEY_CURRENT_USER ->Software ->Micorsoft -> Command Processor。
(7) 对着 Command Processor 右键选 New -> String Value。改名为 Autorun。然后右键那个 Autorun, 选 Modify..., 在 Value data 输入 c:\windows\hole\holedoskey.bat (就是刚才 notepad 新建的文件 path)。OK。
(8) win+r+c 打开新的 cmd (旧的还没有 refresh), 输入 centftp, 就等同于 ftp -A 10.8.7.144(-A 是 login as anonymous)。


3. 
如果是  centos 那边, 可以在 ~/.bashrc 增加 alias winftp="ftp 10.8.7.158"
. ~/.bashrc refresh 即可。不过跟 windows 不一样, 似乎没有 -A。不过我们可以使用 ~/.netrc 文件 (man 5 netrc)。 这个文件坐落在 home directory (如果没有就新建吧)。

default login anonymous password love

那么登入 anonymous 用户就会自动输入 love 密码。由于 anonymous 不需要密码,所以 love 是放爽的。

如果要暂时阻止 ~/.netrc, 可以放 -n argument。

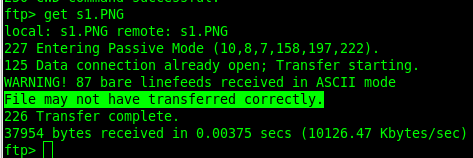
4. File may not have transferred correctly. 错误信息。默认下不 expect 传送图片/binary。收到的图片是 corrupted "有时"不能打开的。


换去 bin (binary mode) 即可解决。(注: 只发生在 CentOS,  Windows 没有这个必要)


5. 要在不储存的情况下,窥看文件的内容, 可以使用 get 文件名字 减号


最后,来一只 pikachu 镇楼。